
Making the Most of Old Photos
Making the Most of Old Photos
Some links are affiliate links, which means I make a small commission at no extra cost to you. See more info here.
Making the Most of Old Photos
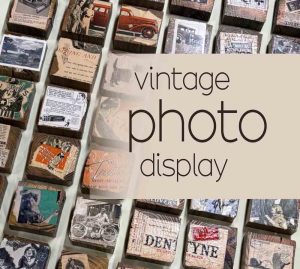
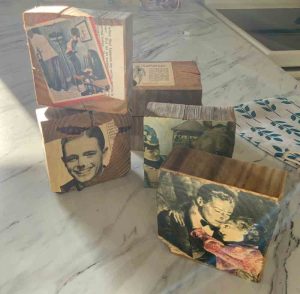
Creating art that uses old photos is not just beautiful and artistic, it is welcoming, nostalgic and full of wonderful memories and history! This particular vintage – inspired project used scraps of old wood posts and interesting antique timber. For this particular project, this is what I used for supplies:
- Old magazines, magazine ads
- Scissors
- A sponge brush or old paintbrush
- Wood pieces (these particular blocks came from an old fence post that I cut using a miter saw) various sizes or 3-1/2″ squares like you see here
- Mod Podge (satin)
You can also use Mod Podge (gloss)
Alternatively, you can make your own using Elmer’s glue
Make your own glue - Polyurathane (water-based or oil-based; keep in mind that oil-based will require additional clean up but may be more durable.)Although the project itself took a little time to gather photos and graphics for the art, the end result was worth it. The following blog is basically how I created this art.
- Access to a Mitre saw
Getting Started
- Coat the wood with Mod Podge or glue mixture.
- Place your magazines or graphics on top of the Mod Podge, smoothing it out to remove any wrinkles or air bubbles.
- Once the first layer is dry, apply another coat of Mod Podge on top to seal and protect your .project.
- Repeat the process as needed, allowing each layer to dry before applying the next.
- Mod Podge can be used for a variety of decoupage projects, such as scrapbooking or home decor.
A large part of the step by step project is written really well by this website. I’d encourage you to check them out!
Mod Podge is a versatile crafting tool that can be used in various projects to add a layer of sealant and protection. Mod Podge can also be used on other surfaces like wood, glass, and metal to create unique and personalized items. When working with porous surfaces like wood, applying a thin layer of Mod Podge before adhering the paper or fabric can help prevent bubbling or wrinkling. Additionally, using a foam brush or a soft bristle brush can provide smoother application and better coverage.
For more intricate projects involving multiple layers or delicate materials, consider using Mod Podge in combination with other techniques such as an image transfer. Experimenting with different finishes of Mod Podge, such as matte, gloss, or satin, can also enhance the visual appeal of your projects.
Furthermore, incorporating embellishments like glitter, sequins, or beads into your Mod Podge projects can add texture and dimension. Mixing Mod Podge with acrylic paints or pigments allows for custom color options to match your creative vision.
Overall, mastering the art of using Mod Podge opens up a world of possibilities! With practice and creativity, you can transform ordinary objects into extraordinary pieces of art that reflect your unique style and personality.
Step 1: Preparing the Surface
Before I applied Mod Podge, I prepared my surface. You also, can follow these steps for the best results:
- Sand the surface lightly to create a rough texture, especially if it’s a smooth, glossy or painted surface.
- Clean the surface with a damp cloth to remove any dust.
- Make sure the surface is completely dry before applying Mod Podge, as moisture can affect how well the graphics stick. In this case I used old magazine ads. This technique worked well because the paper of the magazines was quite thin.
Step 2: Applying the First Layer of Glue
Once my wood was prepared, I was ready for the first layer of Mod Podge. I used these steps:
- Dip brush into the Mod Podge or glue of choice, making sure to remove any excess.
- Apply a thin, even coat of Mod Podge to the surface, using smooth brush strokes.
- Work in small sections to ensure the Mod Podge doesn’t dry before you apply your paper or fabric.
- Avoid applying too much since it can cause wrinkles or bubbles in your project.
- Allow the first layer to dry completely before moving on to the next step.
Step 3: Laying Down Your Material
After applying the first layer of Mod Podge, it’s time to lay down your material.
- Place your scrapbook paper or old photos on top of the Mod Podge layer.
- Gently press down the paper, starting from the center and working your way out to remove any air bubbles or wrinkles.
- Smooth out the paper or photo using your fingers or a brayer to ensure a secure bond with the Mod Podge.
- Allow the second layer to dry completely before moving on to the next step.
Step 4: Applying the Top Coat
Once your material is in place, it’s time to apply the top coat of Mod Podge to seal and protect your project.
- Apply a thin, even layer of Mod Podge on top of your paper or photos, using smooth brush strokes.
- Make sure to cover the entire surface, paying attention to the edges to prevent lifting or peeling.
- If desired, you can add multiple layers of Mod Podge for added durability and protection.
- Applying too much Mod Podge can create visible brush strokes. You may or may not want that look, depending on how rustic you’d like the art to be.
- Allow the top coat to dry completely before handling or displaying your finished project.
Step 5: Drying and Curing Times
After applying the final layer of Mod Podge, it’s important to allow your project to dry and cure properly.
- Mod Podge dries to the touch within an hour, but it’s best to let it dry for 24 hours before handling or moving your project.
- For Hard Coat formula, the recommended dry time is 72 hours, especially for furniture projects.
- Patience is key when it comes to drying and curing Mod Podge. Rushing the process can lead to wrinkles, bubbles, or a tacky finish.
- Avoid placing heavy objects on top of your project until it has fully dried and cured.
- Remember that curing time may vary depending on the temperature and humidity of your environment.
Common Mod Podge Issues
While Mod Podge is a versatile craft supply, it’s not without its challenges. Here are some common issues you may encounter and how to troubleshoot them:
- Bubbles: To avoid bubbles, apply Mod Podge in a thin, even layer and smooth out your material carefully.
- Wrinkles: Smooth out your material as you go, starting from the center and working your way out to prevent wrinkles.
- Cloudy Finishes: Cloudy finishes can occur if you apply Mod Podge too thickly. To fix this, apply a clear acrylic spray sealer on top for a smooth and glossy finish.
Does Mod Podge dry clear?
Yes, Mod Podge dries clear, but the finish may vary depending on the formula and application. Here’s what you need to know:
- Mod Podge is designed to dry to a clear finish, allowing the underlying materials to show through.
- However, keep in mind that Mod Podge can slightly alter the appearance of certain materials, such as paper or fabric.
- The quality of your Mod Podge and the thickness of your application can also affect the clarity of the finish.
- It’s important to apply Mod Podge in thin, even layers to achieve the best results and a clear finish.
- If you’re unsure about the clarity of your Mod Podge, do a test on a small piece of your material before applying it to your project.
Caring for Your Mod Podge Creations
Taking proper care of your Mod Podge creations will ensure their longevity and keep them looking their best. Here are some tips for caring for your Mod Podge projects:
- Avoid exposing your Mod Podge creations to excessive moisture or harsh cleaning chemicals.
- When cleaning, use a damp cloth and gentle, non-abrasive cleaners to wipe away dirt or dust.
- Be mindful of the environment your Mod Podge project is in, as extreme temperatures or direct sunlight can affect its durability.
- Consider applying a protective coat of clear acrylic spray sealer to your project for added longevity and protection.
Cleaning and Maintenance Tips
As I mentioned earlier, oil-based poly can be a little more of a hassle to clean up. Water-based poly is great if you are ok with a little less durability.
Frequently Asked Questions
Does Mod Podge Really Dry Clear?
Yes, Mod Podge dries clear, but the final finish may vary depending on the formula and application. It’s important to apply Mod Podge in thin, even layers for the best clarity.
How Long Should Mod Podge Take to Dry Completely?
Mod Podge typically dries to the touch within an hour, but it’s best to let it dry for 24 hours before handling or moving your project. Thicker layers or multiple layers may require additional drying time.
How to Make Mod Podge?
You can make your own Mod Podge using common household ingredients. Mix equal parts white craft glue (such as PVA glue) and water to create a homemade Mod Podge that is both cost-effective and easy to use.
Does Mod Podge turn yellow over time?
Mod Podge can turn slightly yellow over time, especially when exposed to sunlight or UV light. To prevent yellowing, store your Mod Podge projects away from direct sunlight.
Can I use white glue instead of Mod Podge?
Yes, white glue can be a substitute for Mod Podge, but it may not provide the same durability or finish. Mod Podge is specially formulated for crafts, offering a strong hold and clear, smooth results.
Would you rather have someone help you with your art projects and photos? I can help! Check this out!
_ _ _ _ _ _
Blessed is the man who does not walk in the counsel of the wicked, or set foot on the path of sinners, or sit in the seat of mockers.
But his delight is in the Law of the LORD, and on His law he meditates day and night.
He is like a tree planted by streams of water, yielding its fruit in season, whose leaf does not wither, and who prospers in all he doe
Psalms 1:1-3
_ _ _ _ _ _
Shopping List for all things rustic decor and more
- Scissors
- A sponge brush or old paintbrush
- Mod Podge (satin)
You can also use Mod Podge (gloss)
Alternatively, you can make your own using Elmer’s glue - Polyurathane (water-based or oil-based; keep in mind that oil-based will require additional clean up but may be more durable.)Cute Apron
- Access to a Mitre saw
Other shopping supplies you might like:
Where to keep the chicks when you first get them!
Grow from seed any plants to feed the chickens!
A great resource for leaning about chickens and all other aspects of homestead living!
Heated water bucket for norther winters!
Growing resources
Great website for other recipe mixes
Here is a great place to order seeds.
Strainer Lids for jars (Sprouting)
Another option for straining (Sprouting)
Trays for growing Microgreens with Domes
A Kit if you would rather have everything together
Good resource for explaining and growing sprouts versus microgreens
Another great resource for information
Best site for buying seeds: High Mowing Seeds- Microgreens
Gardening gloves (these are awesome)
Some links are affiliate links, which means I make a small commission at no extra cost to you. See more info here.
Creating art that uses old photos is not just beautiful and artistic, it is welcoming, nostalgic and full of wonderful memories and history!