Recipe for Pretty (and Rustic) Pitas
Recipe for Pretty (and Rustic) Pitas

Recipe for Pretty Pitas
Eating salad doesn’t have to be boring…especially if you eat salad in one of these pretty pitas! This creative creation can be customized in so many ways! This particular recipe is great because it utilizes a fermented sourdough starter. The texture is a little chewy if it is baked too long. However, if you do bake it too long, you can certainly eat the remains as you would a cracker!
I talk about sourdough starters in my other blog, here.
Why Sourdough?
When I first started working with bread, crackers or pita, I was looking for a sourdough recipe that didn’t have to be watched to determine when the starter was at it’s peak to use it. Also, my body seemed to adjust well to this sourdough bread even though I kind of try to stay away from wheat. If I eat fermented wheat bread, it really doesn’t bother me unless I eat a LOT. When I look at the foods recommended for my blood type, it tells me that rye is neutral for me, so I set out to find a sourdough rye recipe that could maybe even be a little beneficial for me. (Check out the D’Adamo website, ForYourtType.com to find out more about blood type foods.) However, fermented foods are tremendously healthy for all blood types (in my opinion) and are really fascinating to learn about. It is worth the effort to learn!
Read more about developing the starter for the recipe for pretty pitas here. Then, come back here with your starter, and make pita with me!
Ingredients for Recipe for Pretty Pitas
3/4-1 c of flour (wheat or rye; this looks like a good one)
1 tsp to 1 tblsp of maple syrup (can use honey; preferable local and not crystalized)
1/2 cup of mature sourdough starter (wheat or rye)
a few tablespoons of water on hand to help the dough come together
salt to taste
optional herbs such as rosemary, thyme, parsley, chickweed
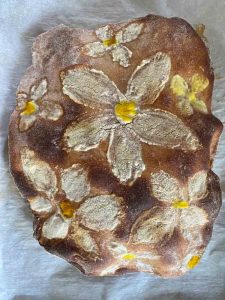
additional food coloring and and flour to create the recipe for paint pretty pitas (I’ll discuss the painting parts in another blog, if you are interested!)

pita before it is baked
Instructions
1. Mix all ingredients together with a pinch of salt. Do not include any herbs at this point, unless you want to. (Add more salt later to taste.) If the ball seems crumbly, add a little water (teaspoon at a time), until ball pretty much sticks together but isn’t too wet.
2. Wrap the dough ball in a beeswax wrap or plastic wrap and put into the fridge for 20 minutes.
3. Split the dough in half and work on half at a time. Roll dough in between 2 pieces of parchment paper, lightly floured if needed.
4. Roll into a rounded shape. Be careful not to make any holes in the center so that steam will build on the inside. Alternatively, you can cut an oval shape.
5. Place into a 400 degree oven, with parchment for approximately 7 minutes. Flip (optional and make for an additional 5-7 more minutes. Dough should puff up.
6. Remove from oven, allow to cool for a few minutes then carefully cut in half to expose the inside of the pita.
7. Fill with your favorite salad toppings and pair with this delightful ranch dressing!
He makes peace in your borders; he fills you with the finest of the wheat.
Check out my blog Healthy Wheat Flour or Gluten-Free Flour? for good information about the type of flour to use!
Sourdough pretty pita related equipment or shopping ideas
Equipment Used:
Try this for an alternative loaf pan!
Weck Jars (for keeping sourdough)
Blood type test
Some links are affiliate links, which means I make a small commission at no extra cost to you. See more info here.
Eating salad doesn't have to be boring...especially if you eat salad in one of these pretty pitas!
Ingredients
3/4-1 c of flour (wheat or rye)
1 tsp to 1 tblsp of maple syrup (can use honey; preferable local and not crystalized)
1/2 cup of mature sourdough starter (wheat or rye)
a few tablespoons of water on hand to help the dough come together
salt to taste
optional herbs such as rosemary, thyme, parsley, chickweed
additional food coloring and and flour to paint (I'll discuss in another blog, if you are interested!)
Instructions
1. Mix all ingredients together with a pinch of salt. Do not include any herbs at this point, unless you want to. (Add more salt later to taste.) If the ball seems crumbly, add a little water at a time, until ball pretty much sticks together but isn't too wet.
2. Wrap the dough ball in a beeswax wrap or plastic wrap and put into the fridge for 20 minutes.
3. Split the dough in half and work on half at a time. Roll dough in between 2 pieces of parchment paper, lightly floured if needed.
4. Roll into a rounded shape. Be careful not to make any holes in the center so that steam will build on the inside.
5. Place into a 400 degree oven, with parchment for approximately 7 minutes. Flip (optional and make for an additional 5-7 more minutes. Dough should puff up.
6. Remove from oven, allow to cool for a few minutes then carefully cut in half to expose the inside of the pita.
7. Fill with your favorite toppings and pair with this delightful ranch dressing!

Prep time: 30
Cook time: 15
Total time: 45
Servings: 4
Serving size: 4 pitas
Meal type: Breakfast, Lunch, Dinner, Sidedish, Appetizer, Fermented, Sourdough
Special Equipment needed: baking pan, parchment paper