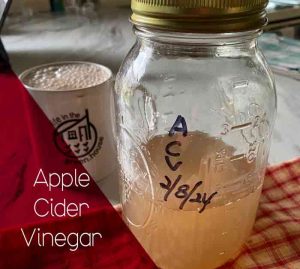
How to Make Your Own Apple Cider Vinegar
How to Make Your Own Apple Cider Vinegar
How to make your own apple cider vinegar
The process to learn how to make your own apple cider vinegar is relatively easy… it just takes some time! My primary uses for this special elixir is for my chickens and for salad dressing. It can be a healthy ingredient for you, depending on your body’s needs.
What are other uses for ACV?
These are some additional recipes you may enjoy:
- Make Hot and Spicy Tonic to boost the immune system.
- Use it to neutralize phytic acid in grains (to aid in digestion).
- Enjoy in bath water for a detox bath and to benefit skin health. Learn how here.
- For use after shampoo, make a DIY hair rinse here.
- Find Sunburn Relief Spray here.
- Here are some tips and recipes for cleaning your home with apple cider vinegar.
- Use apple cider vinegar if you raise goats. Here’s how.
Does raw apple cider vinegar have any proven health benefits?
According to Homestead and Chill, the acetic acid found in apple cider vinegar has been shown to affect obesity, skin pH, and digestion:
- One study showed that daily intake of vinegar might contribute to weight loss.
- Another study found that ACV improved blood sugar and insulin levels.
- Apple cider vinegar hair rinses help restore the scalp’s and hair’s natural pH balance. (Most hair products aren’t the right pH for the scalp and hair, usually too far on the base side of the pH scale. DIY ACV-based conditioners are slightly acidic.)
- Regarding digestion, apple cider vinegar improves digestion by increasing stomach acid production. ACV may also help the liver to detoxify. (Source.)
- ACV can have multiple antimicrobial effects against various microbial species. (Source.)
Ingredients
- 6 cups apples chopped pieces, cores, or peels from (preferably) a variety of apples
- 6 to 7 tablespoons sugar or honey 1 tablespoon for every 1 cup of water used
- 6 to 7 cups pure filtered water warmed, but not hot
- A small piece of previous apple cider vinegar “slimy mother culture” (optional)
Instructions
-
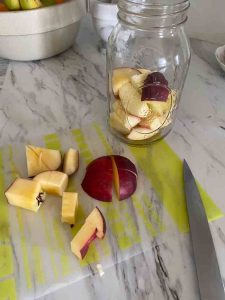
Fill Mason jar(s) 3/4 of the way with apples or apple scraps such as cores, skins and apple itself.
-
Dissolve the sugar or honey into the warm water.
-
Pour sweetened water over the apples. Leave 2 to 3 inches of room at the top of the jar.
-
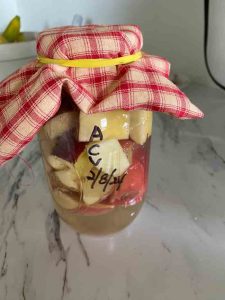
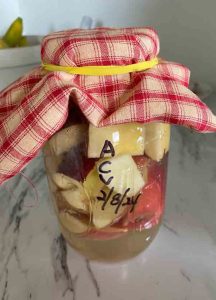
Cover with cheesecloth, thin fabric or coffee filter and a rubber band or mason jar screw-top lid. You could use a rubber band around some fabric as seen above.
-
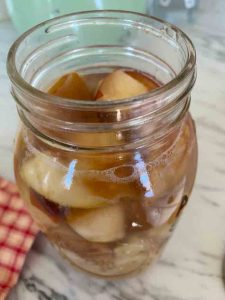
Set in a warm dark place for 2 weeks. (Place on a warm surface, and cover with a tea towel. The smell is good and a bit sweet during this time.) You may see bubbles form on the top of apples.
-
After 2 weeks, strain out the solids, squeezing to extract extra liquid. (Taste the vinegar at this point. It is super delicious!! It’s basically a fermented apple cider!)
-
With the solids removed, you will be able to ferment in a smaller jar. Cover with fresh cheesecloth. Set the fermenting cider in a warm dark place for about 4 weeks.
-
The apple cider vinegar is complete when it has a strong ACV smell and taste. Allow to ferment longer, if not. A mother culture may form on top over time.
Supplies you need to ferment apples
- Organic apples / scraps – Organic produce is always the best choice, especially when it comes to fermenting.The amount of apples needed is flexible. As you’ll see in the recipe, you can scale the portions as needed.
- Filtered Water or other un-chlorinated water is best for making living, fermented things like homemade apple cider vinegar.
- Organic cane sugar
- A large glass jar, your choice of size. We make large batches in this two-gallon glass crock, but many people use far smaller containers – like quart or half-gallon mason jars!
- Bottles to store your finished apple cider vinegar in. Note: This process takes several months from start to finish. The minimum time from starting to using the finished product is about 2 months, though some people let their ACV ferment for 4 months or longer.
A word fitly spoken is like apples of gold in pictures of silver.
Not related to ACV resources but good resources none-the-less:
Did I mention I love this company? Just in case you’d rather not use Amazon.
Cocao (not used in this recipe, but good!
Sea Salt (I prefer this brand)
Recommended Equipment:
Excalibur Dehydrator for seeds, nuts herbs drying to use in your smoothie
Email me if you’d like a LifeintheGreen.House mug, as pictured above!
Some links are affiliate links, which means I make a small commission at no extra cost to you. See more info here.
The process to learn how to make your own apple cider vinegar is relatively easy... it just takes some time!
Ingredients
6 cups apples chopped pieces, cores, or peels from (preferably) a variety of apples
6 to 7 tablespoons sugar or honey 1 tablespoon for every 1 cup of water used
6 to 7 cups pure water warm, but not hot
A small piece of previous apple cider vinegar "slimy mother culture" (optional)
Instructions
Fill Mason jar(s) 3/4 of the way with apples or apple scraps such as cores, skins and apple itself.
Dissolve the sugar or honey into the warm water.
Pour sweetened water over the apples. Leave 2 to 3 inches of room at the top of the jar.
Cover with cheesecloth, thin fabric or coffee filter and a rubber band or mason jar screw-top lid.
Set in a warm dark place for 2 weeks. (Place on a warm surface, and cover with a tea towel. The smell is good and a bit sweet during this time.) You may see bubbles form on the top of apples.
After 2 weeks, strain out the solids, squeezing to extract extra liquid. (Taste the vinegar at this point. It is super delicious!! It's basically a fermented apple cider!)
With the solids removed, you will be able to ferment in a smaller jar. Cover with fresh cheesecloth. Set the fermenting cider in a warm dark place for about 4 weeks.
The apple cider vinegar is complete when it has a strong apple cider vinegar smell and taste. Allow to ferment longer, if not. A mother culture may form on top over time.
Prep time: 10
Cook time:
Total time:
Servings:
Serving size:
Meal type: Appetizer, Fermented, Raw
Special Equipment needed: jars

